


Pets hold a special place in our hearts, and as pet owners, we strive to provide them with the best care possible. One way to pamper our beloved furry friends is by preparing homemade treats that are not only tasty but also packed with wholesome ingredients. In this blog article, we will explore the world of pet-friendly recipes and share a variety of healthy and delicious treats that you can easily make at home. These treats are designed to cater to different dietary needs and preferences, ensuring that your pet receives nutritious snacks that contribute to their overall health and well-being.
The Importance of Healthy Treats for Pets
In this section, we will delve into the significance of offering healthy treats to our pets. We’ll discuss how treats can play a vital role in training, behavior management, and strengthening the bond between pet and owner. We’ll also highlight the benefits of choosing treats made with high-quality, natural ingredients, such as improved digestion, healthy coat, and weight management.
Choosing the Right Ingredients
The key to creating nutritious pet treats lies in selecting the right ingredients. In this section, we’ll provide a comprehensive guide on choosing ingredients that are safe and beneficial for your pet. We’ll explore the nutritional value of various food groups, including lean proteins, whole grains, fruits, and vegetables. We’ll also discuss ingredient alternatives for pets with specific dietary restrictions or allergies, ensuring that every pet can enjoy homemade treats tailored to their needs.
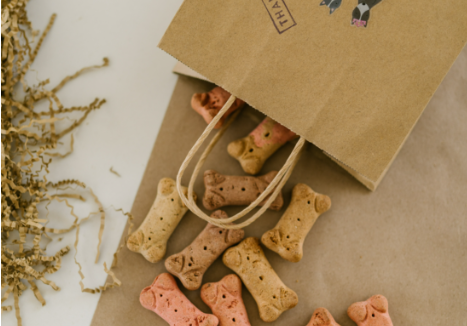
Quick and Easy Treat Recipes for Dogs
Dogs are known for their love of treats, and in this section, we’ll share a collection of quick and easy recipes that will have your canine companion drooling with delight. From homemade peanut butter and pumpkin biscuits to frozen yogurt treats and savory meatballs, we’ll provide step-by-step instructions and helpful tips to ensure success in the kitchen. Below are some dog-friendly treat recipes are not only mouth watering but also packed with nutrients to keep your dog healthy and happy.
Recipe 1: Peanut Butter and Pumpkin Biscuits
Ingredients:
- 1 cup pumpkin puree
- 1/4 cup peanut butter (make sure it doesn’t contain xylitol)
- 2 1/2 cups whole wheat flour
- 1 teaspoon cinnamon
Instructions:
- Preheat the oven to 350°F (175°C) and line a baking sheet with parchment paper
- In a bowl, mix together the pumpkin puree and peanut butter until well combined
- Gradually add the whole wheat flour and cinnamon to the bowl, stirring until a dough forms
- Roll out the dough on a lightly floured surface and cut into desired shapes using cookie cutters
- Place the biscuits onto the prepared baking sheet and bake for 25-30 minutes, or until golden brown
Allow the biscuits to cool completely before serving them to your pup.
Recipe 2: Frozen Yogurt Treats
Ingredients:
- 1 cup plain Greek yogurt
- 1 ripe banana, mashed
- 2 tablespoons honey (optional)
- 1/4 cup blueberries (or any other dog-safe fruits)
Instructions:
- In a bowl, combine the Greek yogurt, mashed banana, and honey (if using) until well blended
- Gently fold in the blueberries
- Spoon the mixture into ice cube trays or silicone molds
- Place the trays in the freezer and let them freeze for at least 2 hours or until solid.
- Once frozen, remove the treats from the trays and store them in a freezer-safe container
Serve these refreshing treats to your dog on a hot day or as a special reward for good behavior.
Wholesome Treat Recipes for Cats
Cats have their own unique preferences when it comes to treats, and we haven’t forgotten about our feline friends. In this section, we’ll introduce a range of recipes that will tempt even the pickiest of cats. From homemade tuna and salmon treats to catnip-infused biscuits and frozen fish popsicles, we’ll provide detailed instructions on how to prepare these delectable treats. These treat recipes are designed to meet your cat’s nutritional needs and provide them with a taste experience they won’t be able to resist.
Recipe 1: Tuna and Catnip Biscuits
Ingredients:
- 1 can of tuna in water, drained
- 1 cup whole wheat flour
- 1 egg, beaten
- 1 tablespoon dried catnip
Instructions:
- Preheat the oven to 350°F (175°C) and line a baking sheet with parchment paper
- In a bowl, combine the drained tuna, whole wheat flour, beaten egg, and dried catnip
- Mix the ingredients together until a dough forms
- Roll out the dough on a lightly floured surface and cut it into small, bite-sized pieces
- Place the biscuits onto the prepared baking sheet and bake for 12-15 minutes or until they are firm and golden
Allow the biscuits to cool completely before offering them to your feline friend.
Recipe 2: Frozen Fish Popsicles
Ingredients:
- 1 can of fish in water or broth (tuna, salmon, or sardines)
- 1/2 cup low-sodium chicken broth
- Cat-friendly herbs (such as catnip or parsley) for added flavor (optional)
Instructions:
- Drain the fish from the can and flake it into small pieces
- In a blender, combine the fish flakes and chicken broth. Add the cat-friendly herbs if desired
- Blend the mixture until smooth
- Pour the mixture into ice cube trays or silicone molds
- Place the trays in the freezer and let them freeze for at least 2 hours or until solid
- Once frozen, remove the fish popsicles from the trays and store them in a freezer-safe container
Serve these chilled treats to your cat for a refreshing and flavorful snack.
Treats for Small Pets and Exotics
Small pets and exotic animals deserve tasty treats too! In this section, we’ll explore treat options for rabbits, guinea pigs, birds, and reptiles. Below are recipes for homemade hay for rabbits, seed and fruit treats for birds, and even insect-based treats for reptiles.
Recipe 1: Homemade Hay
Ingredients:
- Fresh grass or meadow hay (make sure it’s free from pesticides or chemicals)
- Drying rack or baking sheet
- Well-ventilated, dry area
Instructions:
- Start by collecting fresh grass or meadow hay. Ensure that the grass is free from pesticides, chemicals, or any potential harmful substances.
- Gather a good amount of grass or hay, enough to make a decent-sized bundle.
- Shake off any excess dirt or debris from the grass or hay.
- Bundle the grass or hay together tightly, making sure it is secure and compact.
- Find a well-ventilated area where you can hang the bundle or place it on a drying rack or baking sheet. It’s essential that the area is dry and has good air circulation to aid in the drying process.
- Hang the bundle upside down or place it on the drying rack or baking sheet. Make sure there is enough space between each bundle or layer of grass to allow air to circulate.
- Leave the grass or hay to dry naturally for several days or until it becomes completely dry and crisp. This process may take around 1-2 weeks depending on the humidity and temperature of the drying area.
- Once the hay is fully dried, carefully remove it from the drying area and store it in a clean, dry container or bag. Make sure to seal the container properly to maintain its freshness.
- Offer the homemade hay to your rabbits as a high-fiber and nutritious source of forage. Place it in their hay feeder or scatter it around their enclosure to encourage natural foraging behavior.
Remember to regularly inspect the hay for any signs of mold, dampness, or pests, and replace it as needed to maintain its quality and safety for your rabbits.
Recipe 2:
Ingredients:
- Bird-safe seed mix (choose a blend suitable for your bird’s species)
- Bird-safe dried fruits (such as dried apple, banana, mango, or cranberries)
- Honey (optional)
Instructions:
- Preheat your oven to a low temperature, around 200°F (95°C).
- Take a small amount of bird-safe seed mix and place it in a bowl.
- If desired, you can add a small drizzle of honey to the seed mix to enhance sweetness and help bind the ingredients together. However, honey should only be used sparingly and is optional.
- Add the bird-safe dried fruits to the bowl, ensuring they are chopped into small, bite-sized pieces that are suitable for your bird’s size.
- Mix the seed mix and dried fruits together until they are evenly combined.
- Line a baking sheet with parchment paper.
- Take small spoonfuls of the seed and fruit mixture and place them on the baking sheet, spacing them out to allow for even cooking.
- Place the baking sheet in the preheated oven and bake the treats for approximately 15-20 minutes, or until they are dry and slightly crispy. Keep an eye on them to prevent burning.
- Once the treats have cooled completely, transfer them to an airtight container for storage.
- Offer the homemade seed and fruit treats to your bird as a delicious and nutritious snack. You can place them in their treat dish, use them for training purposes, or sprinkle them in their foraging toys for added enrichment.
Introduce new foods gradually to your bird’s diet and monitor them for any adverse reactions. It is important to use bird-safe seeds and dried fruits while avoiding any ingredients that may be harmful to your bird’s health.
Recipe 3:
Ingredients:
- Live insects suitable for your reptile’s species (such as crickets, mealworms, or dubia roaches)
- Calcium powder (optional, for dusting)
- Reptile-safe fruits or vegetables (optional, for flavor and variety)
Instructions:
- Start by selecting live insects that are appropriate for your reptile’s species. Ensure that they are from a trusted source and are free from any pesticides or harmful substances.
- If desired, you can dust the live insects with a reptile-specific calcium powder. This helps provide additional calcium supplementation for reptiles that require it. Follow the instructions on the calcium powder packaging for proper application.
- Prepare a suitable container or enclosure for the insects. This could be a separate container or the reptile’s regular feeding dish.
- Optional: You can add some reptile-safe fruits or vegetables to the container to provide flavor and variety to the insects. Some examples include slices of apple, carrot, or leafy greens. Make sure the fruits or vegetables are safe for your reptile and do not contain any harmful substances.
- Place the live insects (and optional fruits or vegetables) in the container or enclosure and offer it to your reptile.
- Allow your reptile to hunt and consume the insects as they would in their natural environment. This provides mental stimulation and mimics their natural feeding behavior.
- Monitor your reptile during feeding to ensure they are safely consuming the insects. Remove any uneaten insects or fruits/vegetables from the enclosure after the feeding session.
It is important to provide a varied diet for reptiles. Make sure to include appropriate feeder insects as part of their nutrition. Always consult with a veterinarian or reptile specialist to determine the specific dietary requirements for your reptile’s species and individual needs.
Storage and Safety Tips
Proper storage and safety are indeed crucial aspects when it comes to homemade pet treats. Let’s delve into the details:
Storage
- Keep homemade pet treats in airtight containers or sealed bags to maintain freshness and prevent them from becoming stale or contaminated.
- Store treats in a cool, dry place away from direct sunlight and heat, as exposure to heat and moisture can promote spoilage.
Allergens and Safe Food Handling
- Be aware of any potential allergens that may affect your pet. Common allergens for pets include certain grains, dairy products, and specific protein sources like chicken or beef. If your pet has known allergies or sensitivities, avoid using those ingredients in homemade treats.
- Practice safe food handling techniques to prevent cross-contamination. Wash your hands thoroughly before and after preparing treats, and ensure that all utensils, cutting boards, and surfaces used are clean.
Conclusion
These recipes are just a starting point, and you can get creative by adjusting ingredients or trying different flavors to suit your pet’s preferences. Remember to always consider your pet’s specific dietary needs and any food allergies or sensitivities they may have. By preparing these homemade treats, you can ensure that your furry friend is getting a nutritious and delicious reward, made with love!
Preparing homemade treats for your pet is a wonderful way to show them love and care. By using high-quality ingredients and following simple recipes, you can create tasty and nutritious treats that contribute to your pet’s overall health and happiness. Whether you have a dog, cat, or small pet, there are endless possibilities to cater to their taste buds and dietary needs. So, let’s embark on this culinary adventure and treat our furry friends to homemade goodness that will make their tails wag, purrs resonate with contentment, and nibbles be filled with delight!